
In today's article, I'm going to show you the process to reset MySQL/MariaDB root passwords…
In this article, I’m going to show you how to install WHMCS on a VPS or a Dedicated server running CentOS 6.7. This should work on almost any version of CentOS 6, but don’t quote me on that! Package changes might change in a way that is unforeseen!
This article assumes you have a general understanding of Linux and the command line, and that you know How to Install Apache, MySQL, and PHP on CentOS 6.7.
Additionally, this article assumes that you are running upgraded version of the MySQL, and PHP binaries.
Without further ado, let’s jump into getting WHMCS set up!
1. Verify That Apache, MySQL, and PHP are running
First, if you haven’t yet configured Apache for VirtualHosts, I suggest you read my article on How To Configure a VirtualHost for Apache 2.2 on CentOS 6.7
If you’ve got that out of the way, we can move on to verifying that all the required services for WHMCS are installed and operational.
Check Apache and PHP Status
First type in the following, to make sure the service is running:
service httpd status
You should see the following:
httpd (pid 1499) is running...
Looking good. Let’s continue.
Create a directory to contain your WHMCS installation. You can name it whatever you want, just keep in mind this is how users will access WHMCS, and they will see what you name it in the URL bar. For this article, we’re going to be calling the directory “whmcshome”
Once you’ve confirmed your VirtualHost is in place, we can take a look at MySQL
Check MySQL Status
Type in the following:
service mysqld status
You should see the following:
mysqld (pid 26003) is running...
Now we need to create the WHMCS user and database. Type the following and enter your MySQL password (if configured)
mysql -u root -p
Create the WHMCS Database:
create database whmcs;
Create the WHMCS User:
grant all on whmcs.* to 'whmcs'@'localhost' identified by 'yourpassword';
Flush the Privilege Tables and Quit:
flush privileges;
quit
MySQL should also be good now, moving on!
2. Download Required PHP Packages
WHMCS requires some extra PHP packages installed in order to work.
yum -y install gd php-mbstring php-gd php-mysql php-pdo php-ZendFramework-Db-Adapter-Pdo-Mysql
We’re also going to need to install the IonCube Loader for PHP. We could do this manually… but that’s such a drag.
If you haven’t already done so, install the Remi and EPEL repositories
rpm -Uvh https://dl.fedoraproject.org/pub/epel/epel-release-latest-6.noarch.rpm
rpm -Uvh http://rpms.famillecollet.com/enterprise/remi-release-6.rpm
Let’s enable the REMI repository globally:
nano /etc/yum.repos.d/remi.repo
Under the section that looks like [remi] make the following changes:
[remi]
name=Remi's RPM repository for Enterprise Linux 6 - $basearch
#baseurl=http://rpms.remirepo.net/enterprise/6/remi/$basearch/
mirrorlist=http://rpms.remirepo.net/enterprise/6/remi/mirror
enabled=1
gpgcheck=1
gpgkey=file:///etc/pki/rpm-gpg/RPM-GPG-KEY-remi
Now install the php-ioncube-loader package:
yum -y install php-ioncube-loader
Confirm that everything installed correctly:
php -v
You should now see the ioncube loader:
PHP 5.4.45 (cli) (built: Sep 2 2015 18:54:00)
Copyright (c) 1997-2014 The PHP Group
Zend Engine v2.4.0, Copyright (c) 1998-2014 Zend Technologies
with the ionCube PHP Loader (enabled) + Intrusion Protection from ioncube24.com (unconfigured) v5.0.18, Copyright (c) 2002-2015, by ionCube Ltd.
with Suhosin v0.9.38, Copyright (c) 2007-2015, by SektionEins GmbH
3. Download WHMCS 6.1 and Extract to VirtualHost Server Root
If you haven’t already created an an account, head over to WHMCS, and sign up.
I would post a download link here, but you need to be a member in order to access it.
Once you’ve downloaded WHMCS, you’ll be left with a zip file. When you extract the zip file, you should see x3 things; the EULA, the README, and a directory called whmcs.
Open the whmcs directory, and using your favorite SFTP/FTP client, upload the contents into your whmcshome directory.
4. Set up WHMCS File and Folder Permissions
Make sure you navigate into your whmcshome directory. The next few commands will contain relative paths.
cd /var/www/virtual/yourdomain.com/public_html/whmcshome
Then, let’s rename the configuration file and set temporary permissions so that the WHMCS installer can write to it:
mv configuration.php.new configuration.php
chmod 777 configuration.php
Next, let’s make sure the permissions for some directories are set correctly:
chmod 777 templates_c/
chmod 777 downloads/
chmod 777 attachments/
5. Run the WHMCS Installer
Now that you’ve uploaded the WHMCS files and set the correct file and directory permissions, you can direct your web browser to the installer URL. Should be something like: http://yourdomain.com/whmcshome/install/install.php
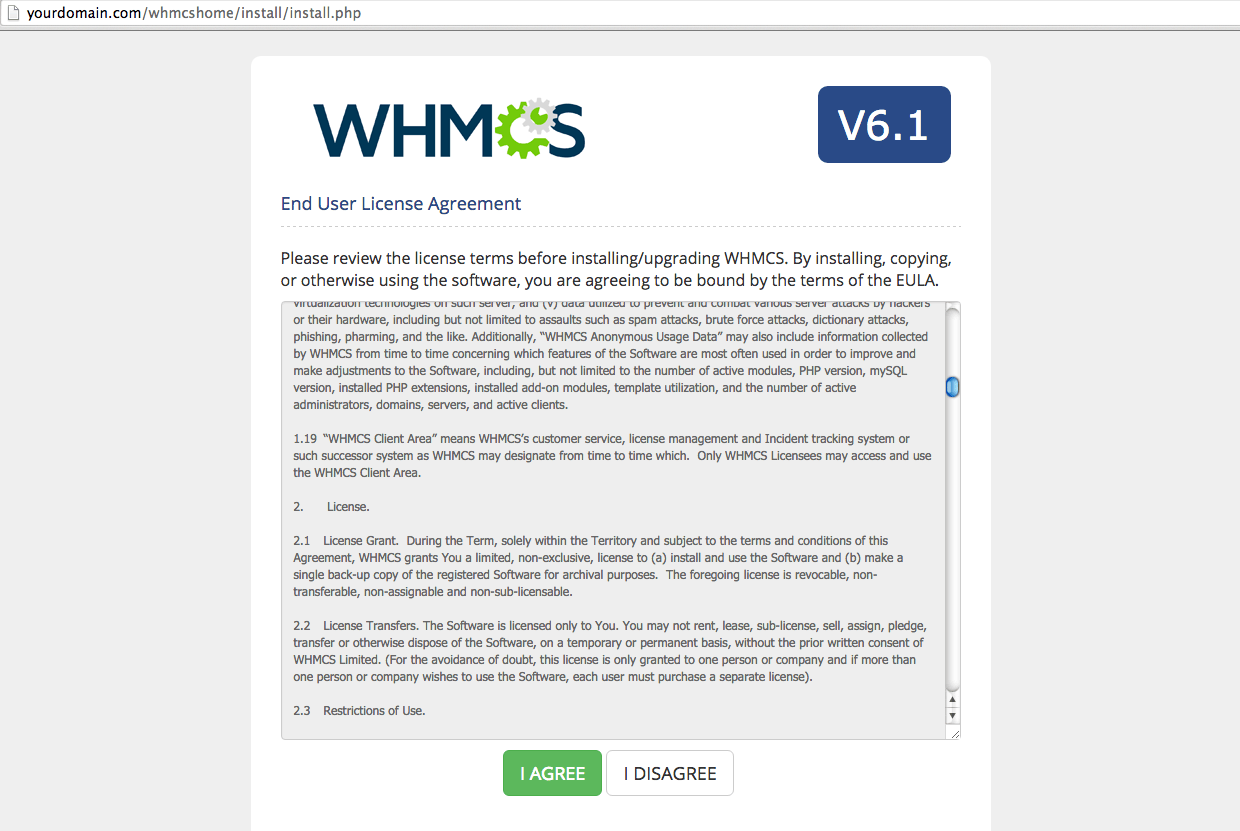
Step 1. Agree to the WHMCS EULA (if you want)
Step 2. Make sure you see the green box letting you know your system passes the requirements check

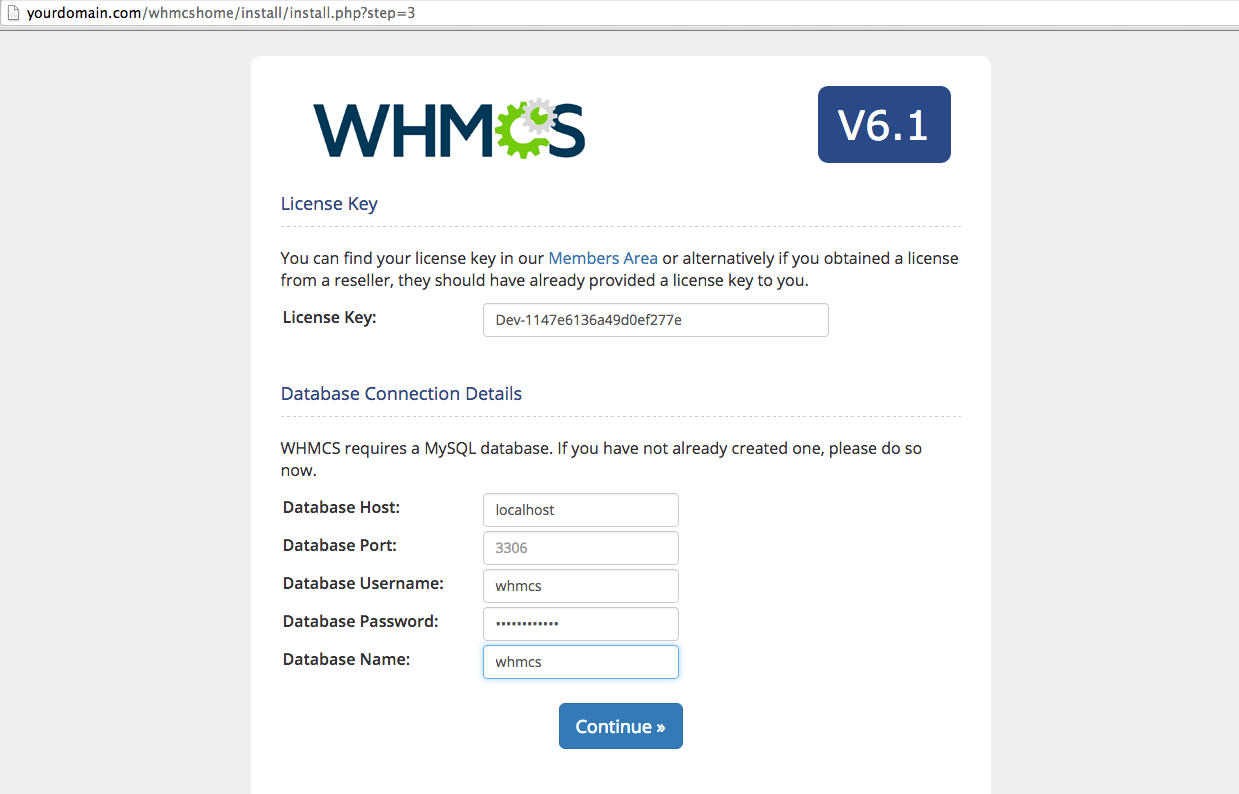
Step 3. Enter MySQL information from Section 1. Leave the host and port settings alone, default should be fine.
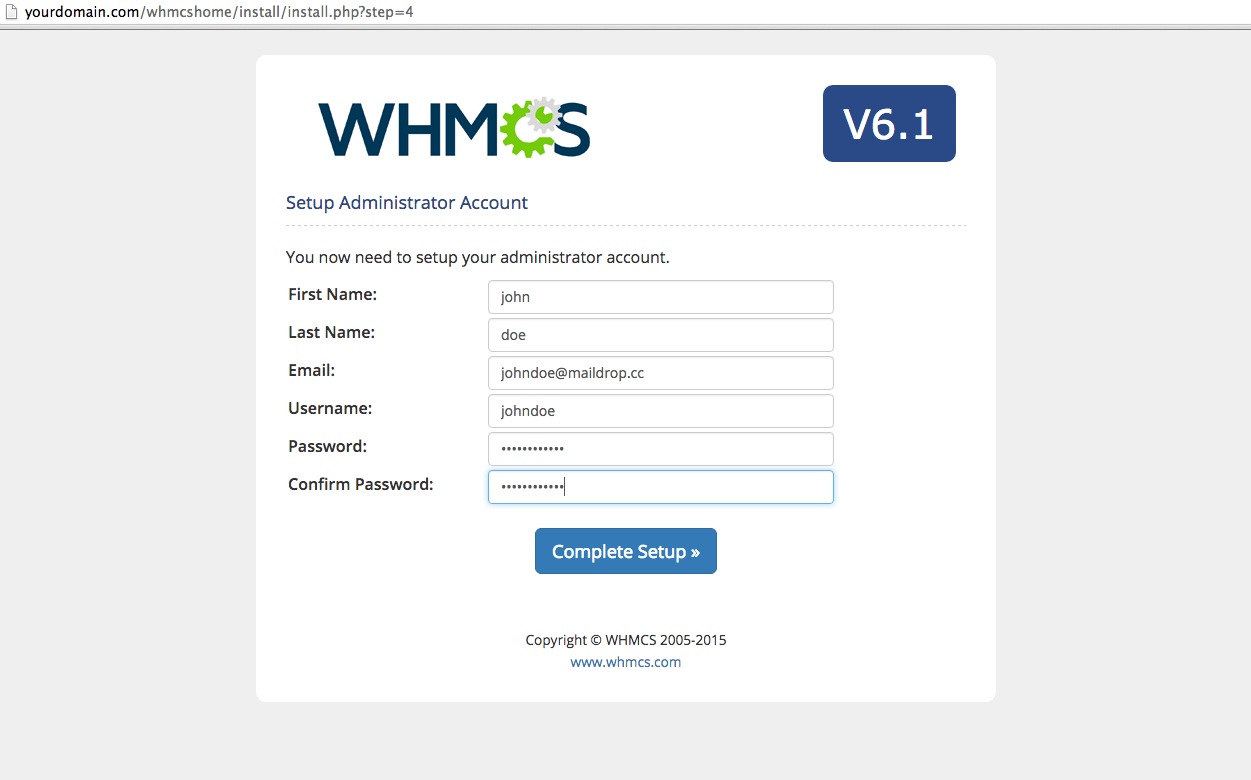
Step 4. Enter the settings you want for your admin area
Step 5. Success!
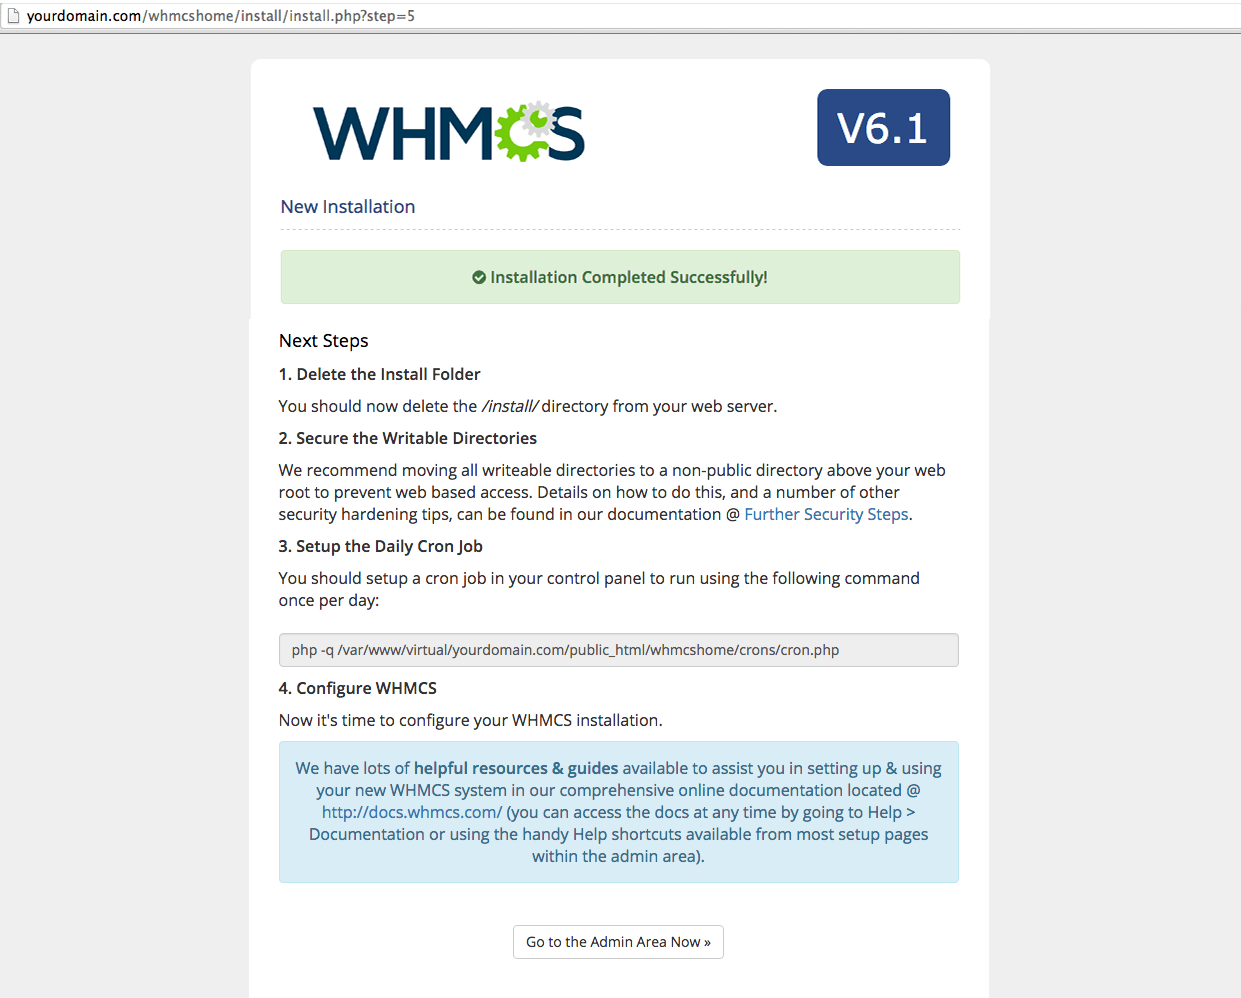
6. Secure WHMCS Installation
Now that we’ve successfully installed WHMCS, we need to secure it. The success page from Step 5 tells you the basics on how to do this. I’ll be writing a more in-depth article on how to do this, but for now, here is the link on How to Further Secure WHMCS.
Nice work! You’ve installed WHMCS and are on your way to web hosting happiness!
Sponsored Links
Perfect guide ! Thank you so much for the easy steps.
Can you please update a new post Installing WHMCS Latest 7.2 version in Latest CentOS 7 vps/dedicated server